Tuesday, January 24, 2012

Looking for people to play Nerf

So I am currently looking for people who would be interested in playing competitive nerf in the spring around the Memphis/Cordova Area.  Why nerf you ask, well its cheaper and safer than paintball and airsoft, it can be played indoors, and is fun for all ages.

What you will need:
  • Eye protection
  • Nerf blaster
  • Darts

Nerf N-Strike Deploy
The current game styles I have planned are: capture the flag, center flag, team deathmatch, free for all death match, and some kind of assault style game.  Most games will be played in either a 4v4 or 5v5 setup.  Also going to try to do some kind of point system, so we can try to keep teams as balanced as possible.

To help get interest I am going to offer the first seven people, who show interest in playing, I will mod a blaster ANY blaster for them at cost (even annoying blasters like the Deploy).  And you do not have to use this right away, you can save it for later.  Also I am currently working on getting some loaner blasters that people can rent, for those of you who don't know what they really want in a blaster, or just cant afford to get a new one.

If people are willing, I think it would also be cool for everyone to donate a few bucks every week to go into a prize pool.  A percentage of this pool would go to repairing the obstacles that are used to make the courses, and then the rest of it could go to some kind of prize.  The prize could either be a cash payout to the top three players, or could go towards buying a big lot of blasters off Ebay so everyone could possibly get something.  Will have to work the details for that out at a later time.

That is about all I have for now, if you have any questions you can contact me at kidnicky@bellsouth.net, stalkervenom@gmail.com, or on facebook.

Thursday, January 19, 2012

Nerf Conversion - Xploderz Xground Pounder 2500 (Part 2)

So the conversion from Xploderz to Nerf was overall fairly easy.  I still have a few things I need to cleanup, but all and all I'm pretty impressed.

First off the tools required to do this mod are fairly simple:
  • dremel
  • pipe cutter
Parts:
  • Xploderz Xground Pounder 2500
  • 1/2 cpvc eblow 90 degrees
  • 1/2 pvc tee
  • 1/2 pvc elbow 45 degrees
  • 1/2 pvc end cap/ball joint
  • 1/2 cpvc pipe
  • 1/2 pvc pipe sch 40
  • Rubber bands
  • Wood or Plastic (for trigger)

After unscrewing your blaster, there are a few parts you can throw away.  Basically anything that is not the plunger system can be tossed out, I kept the little back attachment and the orange piece off the front of the barrel.

What you are now left with is the shell and a punger system.  Detatch the orange pipe connected to the plunger tube, I did it by twisting it.  The plunger tube should have a little nub that sticks out the end, this is important becuase we will be attaching our cpvc elbow here.  (sorry for lack of pictures for this part)

Now you need to cut off all the orange pieces that are connected to the clear barrel, this will become your new rscb clip.  This piece will have to be cut down to fit properly in the blaster. 

The rest of it is pretty simple, connect all the parts like in the picture below.  I connected the cpvc elbow to the pvc tee by nesting a cpvc pipe into some sch 40 pvc, my barrel is attached in the same manner.

 *note out might want to cut a notch out of the end of the clear pipe that goes into the 45 degree elbow so darts will feed properly.

For the trigger system, I used a piece of wood, rubber bands, and the metal handle from a binder clip.  Attach the metal clip to the end of you plunger rod anyway you want, I used duct tape but plan on epoxing it in place later. 

To get everything to fit properly you are going to have to cut off parts of the shell.  I cut off a little too much but most of your problem spots are going to be around where the pvc tee is.

 For the barrel, I cut a about a foot long piece of 1/2 cpvc and nested it into sch 40 1/2 pvc like we did earlier in the plunger system.  Going to have to take a 1/2 spade bit to your sch 40 pvc to get the cpvc to fit in properly.
Summary/Review:

Overall I am pretty impressive with this blaster, and how easy it was to accomplish.  It gets ranges of over 115 feet flat, with all 14 shots the internal rscb clip holds.  The only thing I would really do to this blaster is replace the pvc endcap with a ball valve, and revisit the trigger (which I plan on doing sooner or later).  I payed a little over 25 bucks for all the parts to complete this blaster, and I am very happy with the end result.  Also for those of you who would be interested in playing Nerf competitively in the spring, I am hoping I can finish the write up for all that sometime this week and get that posted (still working on figures for getting started).  But like always if you have any questions or comments I would love to hear them!!!


Sunday, January 8, 2012

Nerf Conversion - Xploderz Xground Pounder 2500 (Part 1)


The title says it all, for this project I will be taking an Xploderz blaster, and converting it to shoot foam darts.  I am going to do this in two parts, the first part will consist of a review of the stock blaster, and the second part will be all the modifications I did to it.  I would like to say that nothing in this modification will be anything new, many people have converted Xploderz blasters to shoot foam darts, but I personally have not seen this blaster converted (many people convert the Ranger ).  I am going to review this blaster in three parts,  first look (before firing), performance, and internals.

*Note: the only reason I bought this blaster was because it was on sale.  And yes I am a 6'2 little kid (with power tools).

First Look:
I found this blaster at Target in the clearance isle, which is probably the only reason I bought it.  I had been looking at the Xploderz line for quite a while, wondering what was really different between them and Nerf blasters.  Other then the fact they shoot these water BB's ( I will describe them a little later), they seem to use the same setup.  The first thing that really caught my eye were the ranges advertised on the box.  Most stock Nerf guns will only shoot about 30-35 feet, the lowest range that I saw on the Xploderz boxes was like 60 feet.  From modding Nerf guns for quite awhile now, I know that Nerf uses air restrictors to lower the ranges that the blasters can achieve, does this mean the Xploderz line 
does not?
After opening the gun up, the first thing I checked out is the plunger system.  The plunger has a ridiculous draw of almost 6 1/2 inches, that is over double what most Nerf guns have (2.5-3 inches) and on par with some of the homemade blasters people are making.  Also the spring appears to be very powerful, I am not sure an eight year old kid could fully prime this blaster over and over (eight and over is the age on the box). 

 
The blaster it self came with a "Mega Clip" which holds 250 of these water BB's.  The water BB's remind me of fish eggs, they have about a 1/4 inch diameter and explode on impact.  The blaster also came with a Ammo Depot, this is what you use to carry your extra rounds, and make your ammo.  The ammo comes in these small packages of 500, and are about 1/16 of an inch big.  You then put them in the Ammo Depot, and fill it up with water, and give them about 4 hours to full absorb all the water.  The clip of the blaster then attaches to the Ammo Depot for reloading.  This is the first kind of annoying thing about this line, is that you really cannot just pick up and go.  It takes 4 hours for the ammo to grow, so you have to have the ammo already made to use it.  These blasters really feel more like a safer version of paintball gun, a more advanced water gun you could say. 

Performance:
The first thing I wanted to see is how accurate the ranges are on the gun, and I must say I am very impressed.  The box undersold how far the gun can actually shoot, fully primed flat shots were hitting 100-115 feet, angled shots were adding another 20 or so feet to that.  One major downfall that I noticed (and I kinda assumed this when looking the blaster over), is that at the end of the barrel there is like a spring loaded door of sorts.  This is to keep the water BB's from rolling out of the blaster, but this also causes them to occasionally explode as they exit.  About half of my initial shots ended up busting as they hit the end of the barrel.

Other then the high failure rate of the ammo itself I have a few more gripes with the product.  Most of which could be easily improved.  The first major problem I have is there is no trigger, you have to pull the plunger rod back and hold it to keep it primed.  As I mentioned before it has a pretty strong spring, and holding it fully primed for long periods of time is quite annoying.  Also the stock slips quite a lot, under the high amount of pressure you are using to prime the blaster.  Adding a trigger is going to be a must for modding this gun. As far as aiming, if you ignore the fact it is hard to shoulder the blaster, the massive clip is right in the way of trying to do any kind of sighting up using the sights on the blaster.  Upon loading the blaster and removing the clip, I found that the blaster is pretty accurate with the sights.

For safety concerns, my dad shot me (he had too much fun).  At like 50 or so feet away, the water BB hit me and bounced, it stung a little.  At point blank range, it stung a little more, but even at point blank range it only stung for a sec or too.  On a scale of 1 to 10, I would give it maybe a two, you know you have gotten hit, but its not hard enough to leave a mark.  I notice the water BB's do not really explode unless they hit a very hard surface, even shooting like the windshield of the expedition, I was getting some bounces.

Internals:
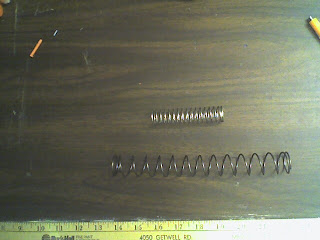
As I pretty much figured out before opening the blaster, there is a ton of dead space (about 20 inches or so).  You should be able to see from the pictures whats going on here.  I compared the spring, plunger tube, and plunger head to that of a Nerf Nite Finder. 

As you can see there is huge difference.  Comparing the two:

Nerf Nite Finder
  • Draw of about 2 inches
  • Plunger tube length 4 inches
  • Plunger head diameter about 1 inches
  • Spring length 3.5 inches
Xploderz Xground Pounder
  • Draw of about 6.5 inches
  • Plunger tube length 8 inches
  • Plunger head 1.5 inches
  • Spring length 8 inches
Summary:
Overall this is a pretty impressive blaster, ranges off 100+ feet are very impressive.  I am still not sure if I would considered this a water gun or what.  I do know I would rather use a Super Soaker then one of these in a water gun war.  The lack of trigger is really the down fall of these blasters.  I am not completely sure a eight year old could even fully prime this blaster,  and at a length of over 30 inches (with the stock), it would be pretty bulky for them to carry around.  At a $50.00 price tag (after tax), I would probably never have bought this blaster, and seeing that Target had 4-5 of them on the clearance isle, I am not the only one who feels this way.  Hopefully I can get this blaster fully modded, and performing where I want it in the next few days.

Monday, January 2, 2012

Happy New Year - Halo Chest Piece

First off I would like to wish everyone a happy new year.  I have been sick over the past few days, so I have not been working on my blog or any of my projects.  Hopefully I will start feeling better soon and get back to work. 

Halo 3 Assault Rifle
Good news, today I was able to pick up the base gun for my assault rifle project.  I would like to thank my buddy Wes for helping me get it!  I plan to start working on this project this week.  Not sure when I expect to finish this one, I have to order quite a bit of electronics off the internet to get it done.  Like I said last week, this gun hopefully have everything that it does in game, including: flashlight, heads-up display, working ammo counter, and all the cosmetics to make it look perfect.

My Halo armor is coming along quite well, I got a dremel for Christmas so I can sand off all the fiberglass bubbles.  The helmet is almost ready for bondo, just have to touch up a few things.  I currently have 5/15 pieces constructed and waiting to be fiber glassed.  

Halo Chest Piece - Pepakura File
The chest piece came together faster then I expected, I think it took me a total of 3 hours to completely cut it out and put it together.  All together it was about 34 sheets of paper to complete it.  It fits on pretty tight, I might end up having to cut it either in two pieces to be able to get in on when everything is all said and done, I will just have to wait and find out.  But anyways here are a few pictures of it, and one with me wearing the helmet and the chest piece.

Front View

Right Side Angled

Left Side Angled

Back Side

Me with Helmet and Chest Piece on

Wednesday, December 28, 2011

Projects Update

Well I would like to start off giving you guys a quick status update of my planned out projects.  This does not include any kind of order or anything.


Halo Armor Suit - I have got 5/15 pieces constructed so far.  Due to the weather (I can not fiberglass if its below 45 degrees outside), this project might go on a bit of a hold.  I do not want to build up a bunch of paper armor pieces that I can not reinforce.  If I can find a place I can store all the pieces I will continue to construct them, but the project as a whole will most likely not be finished until spring.
 
Needle Rifle -  I am really excited to be finally starting this project.  The base of gun is going to be a homemade nerf gun.  This will be the first spring powered homemade nerf gun I will have made ( I tried a while ago and failed, did not make the plunger head seal well ).  I will actually be following a guide this time so hopefully everything will work when its done.  The shell of the gun will be made the same way I have been making my armor suit, but because I can not find a pepakura file of the needle rifle, I will have to make this from scratch.  I have not worked out all the fine details of this project, but I am hoping I can add some nice LED lighting on this project.

Halo Assault Rifle -  I came up with this project in the past two days.  I don't know how much I really want to give out about this project.  I will how ever say that the base of this gun will be a modded Nerf gun ( I do not currently have the gun for this project yet ).  I will be replacing most of the internals on this gun to increase the performance, and also adding a flash light, and display to simulate the gun in the game.
 
Halo Spiker - Most of this project will be just seeing how much cosmetic parts I can add to a Nerf Maverick, and it still function properly.  I have two modded Mavericks that I picked up at either goodwill or for a very low price.  Not sure what all I will actually be able to add, have to see as I go, but the I will be making the blades, trying to wrap the handle in leather, and hopefully a few more cosmetic mods.


That is about it for the updates, I will be posting the write up for the chest piece in the next few days.  If you guys have any other ideas for working replicas from video games or another projects you think I can create, I would love to hear about them.  Always looking for new ideas for projects!

Sunday, December 18, 2011

Halo Amor Update - Helmet

Pepakura Helmet File
So a few of you have been waiting to see this for quite a while now, its not completely done yet.  I probably have another 30 minutes worth of fiber glassing before I will be ready to move on to bondo and paint.

So I used pepakura to make the base of the helmet.  All the pieces took up about 24 sheets of card stock to print out when everything was scaled out.  It took about four hours to cut out all the pieces, fold all the tabs, and glue them together.  There are about 600 or so tabs you have to glue, and you have to wait for the pieces to dry before you can add more pieces (process is slow).

Right Side View
 I forgot to take a picture of the helmet before I started applying fiberglass resin to it, partly because I did not know where my cord for my Treo was, and partly because I was excited.  You only get about 30 minutes to actually work with the fiberglass, before it starts to get too tacky to brush on.  I probably need to put another coat of fiberglass resin on the outside of the helmet, and finish applying the fiberglass sheets to the inside. 

Back Side View

Left Side View
Inside View (before fiber glassing)

Inside View (after fiber glassing)
Front View
As you might have noticed, it is currently not possible for me to see through this helmet.  I am not sure how I am going to go about the visor for this helmet  Its between using a motor cycle helmet visor (which will probably cost around 20 bucks) or making my own.  I want it so that you can not see into the helmet, but you can see outside of the helmet.  Ive seen some people mold plastic sheets and spray them with spray paint for tinting tail lights.  It ends up giving the visor a nice almost mirror surface, and is still pretty clear to see through from the inside.


I estimate that it will probably take me a few months to actually get this helm completely finished, I have no urge to spend hours outside in the freezing cold of winter.  I defiantly do not plan on doing the wet sanding, that needs to be done before painting, while its cold outside.  Other then that, I have be working on the chest piece and a few other of the smaller pieces.  I am going to try to have the crotch piece and at least one of the boots constructed by this time next week.  Once again if you have any comments or questions I would love to hear them, and thanks for visiting!


Wednesday, December 14, 2011

ETEC Final - Sentry Gun

Gun and RFID Box (fully assembled)
Well my friend Bobby and I  managed to finish our final project with no time left.  After spending Wednesday and Thursday fixing one problem after another we finally got it done.  Due to technical limitations it did not perform exactly the way we wanted but it did preform its job. 

For our project we made a sentry gun security system.  It was controlled by a basic stamp micro controller.  We also used two standard servos, a PING ultrasonic sensor, and a RFID reader.

The first problem we ran into was when the code on the basic stamp got to the line where it would try to read a RFID tag, it would hang up until you swiped a tag.  We solved this problem by using two basic stamps to control our project instead of one.  The board with the RFID reader fed two inputs to the other board that would give the out come of a tag being swiped.

RFID Tafs
Once we got that figured out we were able to control our gun the way we wanted.  We wanted it setup so that an authorized tag would temporarily disable the gun allowing you to walk by without getting shot, and after swiping a bad tag it would shoot the gun to keep anyone from trying to tamper or get access by swiping a bunch of tags.

If no tags are swiped then the gun waits until the PING ultra sonic sensor finds a object within range.  We wanted to set this range to five feet but found that at five feet the gun was getting interference, so we had to set it the range to about three and a half feet.  Once the ping found an object it would run through checking code.  The checking code would first check to make sure the object was still there, if so it would shoot, if not it would rotate counter clockwise a few degrees.  It would continue that check until it either shot six times (the amount of darts in the clip) or rotated CCW four times.

To rotate and shoot the gun we used standard servos.  We had one standard servo connected to a piston that would push our darts into a flywheel.  The other servo was mounted into the base of the gun to allow it to move the top portion of the gun.

Dart
The darts are launched using a flywheel, which is two wheels spinning in opposite directions.  We used two dc motors and connect wheels to them.  The motors are powered by their own nine volt battery.  Since the stamp can not handle the amount of current the motors need, we had to use a driver chip.  The driver chip is basically a darlington pair, this allows us to use the stamp to turn on and off the motors and still allow them to use a separate power source.  Once basic stamp tells the gun to shoot there is a sight pause so the motors can get to speed, and then the piston servo pushes a dart into the flywheel.

The clip of the gun gave us a lot of issues, the first being how the darts are weighted.  We wanted to use a gravity feed system, where the darts by their own weight would fall perfectly into place, but since the darts are heavier in the front then the back it would cause them to nosedive in the clip and cause a jam.  The easiest solution to this problem was to use batteries as weight to push the darts down.  We also had to add a piece of wood inside the clip to make sure the darts could not move around. 

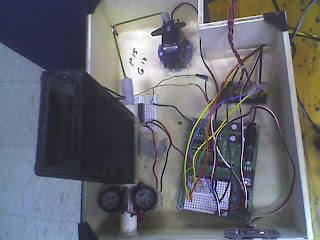
Gun Box (inside)
Overall I am very pleased with our project, but there are a few things I think that could of made it better.  First off we were very limited to what electronic devices we had, that we only had about five weeks to finish the project really limited what we could do.  I think if I were to continue this project I would use an IR sensor instead of the ultrasonic.  The ultrasonic is nice, but for this application there are just way to many things that can go wrong.  I would probably also use an RF transmitter and receiver instead of the long strands of wire we used to connect the two boards.  Even though with RF it is easier to get around it, I think the overall appearance would be nicer.  I would also increase the clip capacity so that it can hold  more then six darts.  

I think that about sums up the entire project if you have any questions, concerns, or comments I would love to hear them!

A few more pictures:


RFID Box (inside)
RFID Box (outside)
Gun with cover off

Gun and RFID Box assmebled
Gun Box (side view)