 |
| Gun and RFID Box (fully assembled) |
Well my friend Bobby and I managed to finish our final project with no time left. After spending Wednesday and Thursday fixing one problem after another we finally got it done. Due to technical limitations it did not perform exactly the way we wanted but it did preform its job.
For our project we made a sentry gun security system. It was controlled by a basic stamp micro controller. We also used two standard servos, a PING ultrasonic sensor, and a RFID reader.
The first problem we ran into was when the code on the basic stamp got to the line where it would try to read a RFID tag, it would hang up until you swiped a tag. We solved this problem by using two basic stamps to control our project instead of one. The board with the RFID reader fed two inputs to the other board that would give the out come of a tag being swiped.
 |
| RFID Tafs |
Once we got that figured out we were able to control our gun the way we wanted. We wanted it setup so that an authorized tag would temporarily disable the gun allowing you to walk by without getting shot, and after swiping a bad tag it would shoot the gun to keep anyone from trying to tamper or get access by swiping a bunch of tags.
If no tags are swiped then the gun waits until the PING ultra sonic sensor finds a object within range. We wanted to set this range to five feet but found that at five feet the gun was getting interference, so we had to set it the range to about three and a half feet. Once the ping found an object it would run through checking code. The checking code would first check to make sure the object was still there, if so it would shoot, if not it would rotate counter clockwise a few degrees. It would continue that check until it either shot six times (the amount of darts in the clip) or rotated CCW four times.
To rotate and shoot the gun we used standard servos. We had one standard servo connected to a piston that would push our darts into a flywheel. The other servo was mounted into the base of the gun to allow it to move the top portion of the gun.
 |
| Dart |
The darts are launched using a flywheel, which is two wheels spinning in opposite directions. We used two dc motors and connect wheels to them. The motors are powered by their own nine volt battery. Since the stamp can not handle the amount of current the motors need, we had to use a driver chip. The driver chip is basically a darlington pair, this allows us to use the stamp to turn on and off the motors and still allow them to use a separate power source. Once basic stamp tells the gun to shoot there is a sight pause so the motors can get to speed, and then the piston servo pushes a dart into the flywheel.
The clip of the gun gave us a lot of issues, the first being how the darts are weighted. We wanted to use a gravity feed system, where the darts by their own weight would fall perfectly into place, but since the darts are heavier in the front then the back it would cause them to nosedive in the clip and cause a jam. The easiest solution to this problem was to use batteries as weight to push the darts down. We also had to add a piece of wood inside the clip to make sure the darts could not move around.
 |
| Gun Box (inside) |
Overall I am very pleased with our project, but there are a few things I think that could of made it better. First off we were very limited to what electronic devices we had, that we only had about five weeks to finish the project really limited what we could do. I think if I were to continue this project I would use an IR sensor instead of the ultrasonic. The ultrasonic is nice, but for this application there are just way to many things that can go wrong. I would probably also use an RF transmitter and receiver instead of the long strands of wire we used to connect the two boards. Even though with RF it is easier to get around it, I think the overall appearance would be nicer. I would also increase the clip capacity so that it can hold more then six darts.
I think that about sums up the entire project if you have any questions, concerns, or comments I would love to hear them!
A few more pictures:
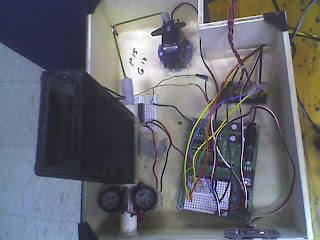
 |
| RFID Box (inside) |
 |
| RFID Box (outside) |
 |
| Gun with cover off |
 |
| Gun and RFID Box assmebled |
 |
| Gun Box (side view) |


 The next one is my assault rifle, this one is going to take alot if time to get just right. I plan on using a Nerf Rayven for the base of the gun and going to make the front part of it with pepakura. Also planning on integrating a full ammo counter and make a speaker for like clip reload noises etc. The assault rifle will also have mag light mounted in the front just like it does in the game. Not sure what all electronics will be added into this gun before it's all said and done, but it should be very impressive.
.jpg)

 The last halo blaster i have planned is the Spiker. This is a relatively easy to do. The base is going to be a Nerf Maverick and the blades will be made with pepakura. Most of this project will focus on the paint and cosmetics. The performance of mavericks are very lacking compared to other Nerf mods, but it is one of the cooler looking blasters. The maverick will have all the standard mods (including the Russian roulette mod), and maybe even a spring upgrade.


